Pear Amigurumi
Original design by @正在拍照的xmw
A plump little crocheted pear worked in continuous rounds with a simple leaf and stem. This sweet fruit amigurumi makes a charming bowl filler, photo prop, or quick handmade gift.
- Difficulty
- Easy
- Time
- 1-2 hours
Materials
- Worsted/DK amigurumi yarnAmazon ↗
- Suitable amigurumi hookAmazon ↗
- Fiberfill stuffingAmazon ↗
- Yarn for leaf and stemAmazon ↗
As an Amazon Associate, Hooklore earns from qualifying purchases. Links open Amazon — a matching product or search results.
Stitches used: sc, MR, inc, dec, ch, dc
Pear Pattern
Body:
Rnd 1: 6 sc in MR (6)
Rnd 2: Inc in each st around (12)
Rnd 3: *Sc, inc* x6 (18)
Rnd 4: *2 sc, inc* x6 (24)
Rnd 5: *3 sc, inc* x6 (30)
Rnds 6-10: Sc in each st around (30)
Rnd 11: *3 sc, dec* x6 (24)
Rnds 12-14: Sc in each st around (24)
Rnd 15: *2 sc, dec* x6 (18)
Rnds 16-18: Sc in each st around (18)
Rnd 19: *Sc, dec* x6 (12)
Rnd 20: Dec x6, fasten off

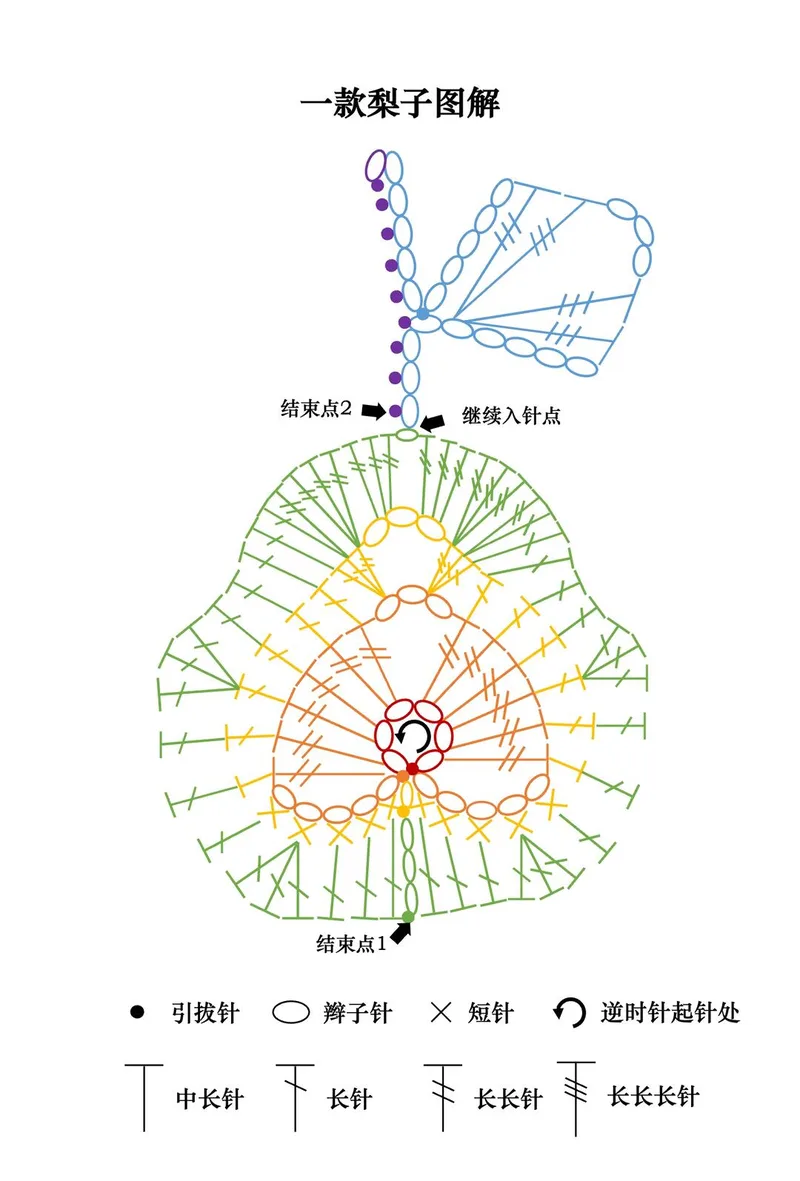
Leaf: Ch start, gradient dc
Stem: Ch, sc tube
Notes
Pear amigurumi. Clear redrawn pattern diagram.
Crochet Diagrams
Frequently asked questions
How is the pear's shape created?
The body increases to 30 stitches over the first five rounds, holds steady through Rnd 10, then decreases in stages (Rnds 11, 15, 19-20) to form the rounded bottom and narrower top of a pear.
When should I stuff the pear?
Add fiberfill gradually as you work the decrease rounds, packing firmly before you close the final 6 stitches with the Rnd 20 fasten-off so the shape stays plump.
How do I attach the leaf and stem?
The stem is a short chain worked into a single-crochet tube and the leaf is a chained piece with gradient double crochets; sew both to the top center of the pear once the body is closed.


