 1/4
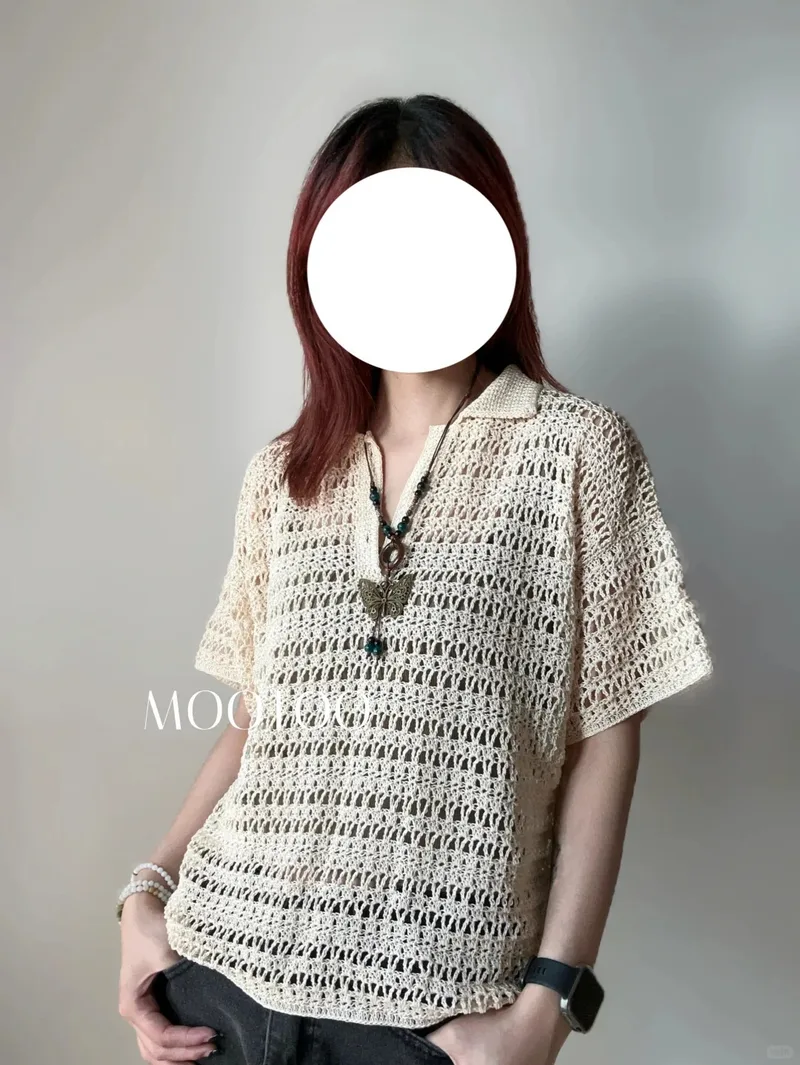
1/4Lace Polo Shirt
Original design by @MOOTOO
A crisp white lace polo shirt worked flat in an openwork V-stitch fan mesh, finished with a collar, buttoned front bands, and set-in sleeves. The fine cotton gives it a fresh, summery feel.
- Difficulty
- Advanced
- Hook
- 3.5mm
- Yarn
- lace
Materials
- #6 fine lace thread (about 310 g, natural beige in the maker's version)Amazon ↗
- 6/0 Japanese hook (3.5 mm)Amazon ↗
- Three 18 mm buttonsAmazon ↗
As an Amazon Associate, Hooklore earns from qualifying purchases. Links open Amazon — a matching product or search results.
Stitches used: ch, dc, sl st
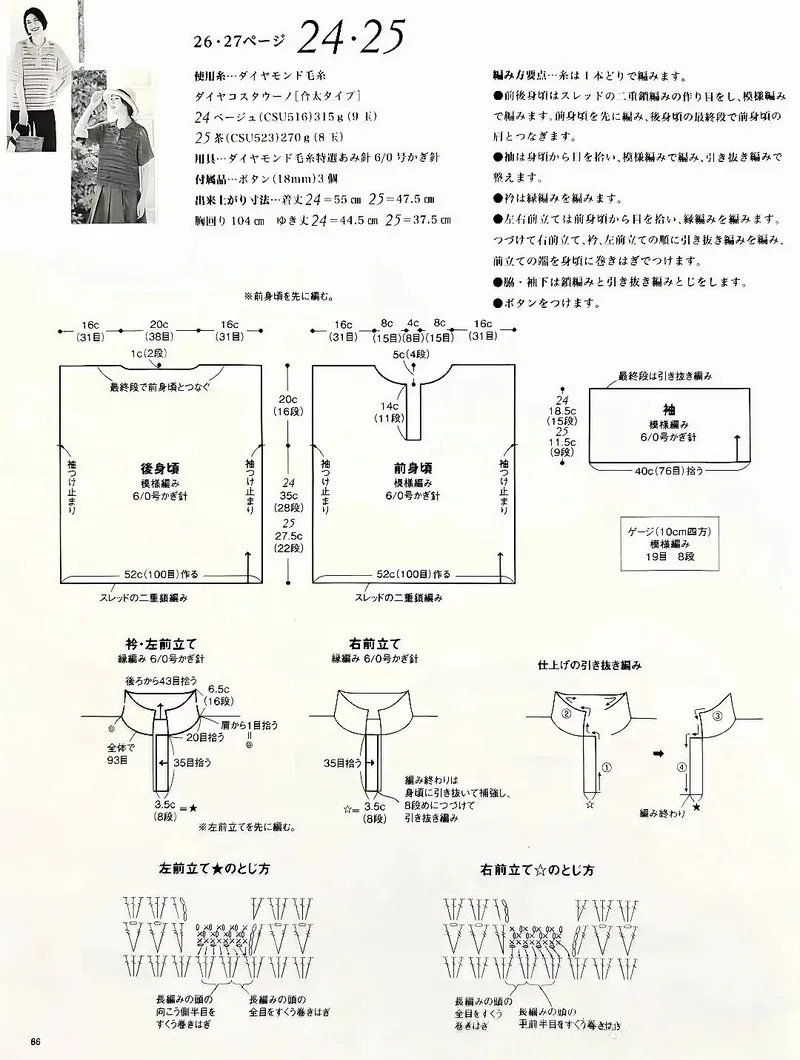
Lace Polo Shirt — Schematic & Assembly (Sizes 24 / 25)

This page is the garment schematic (measurement diagram), not a stitch-by-stitch chart.

Back Body:
- Cast on 52 cm (100 sts) at the lower edge with a foundation double-chain.
- Shoulders: 16 cm (31 sts) each side + back neck 20 cm (38 sts) across the top.
- Work pattern stitch in dc-mesh with a 6/0 (3.5 mm) hook.
- Length: 20 cm (16 rows) at the upper section; final row joins to the front body.
- Armhole / side: Size 24 = 35 cm (28 rows); Size 25 = 27.5 cm (22 rows).

Front Body:
- Cast on 52 cm (100 sts), foundation double-chain.
- Neckline divided 8 cm / 4 cm / 8 cm across the top (15 sts / 15 sts / 31 sts side panels).
- Front neck opening 5 cm (4 rows) deep, neck width 14 cm (11 sts).

Sleeve:
- Pick up 40 cm (76 sts).
- Length: Size 24 = 18.5 cm (15 rows); Size 25 = 11.5 cm (9 rows).
- Final row finished with sl st (join row).

Gauge: 19 sts x 8 rows = 10 cm square in pattern stitch.

Assembly:
- Collar & left front band: pick up 93 sts total (43 sts from back, 1 st per row up the front), work edging in 6/0 (3.5 mm) hook; collar 6.5 cm (16 rows).
- Right front band: pick up 35 sts up the front, work edging; band 3.5 cm (8 rows). Work buttonholes on the right band.
- Join with finishing slip-stitch seam: work the front bands and collar in order, attaching the front band edge to the body with sl st.
- Sew on 3 buttons (18 mm).

Construction notes:
- Crochet the front and back bodies first in pattern stitch, joining at the shoulders.
- Pick up sleeve stitches from the body and work the sleeve in pattern, finishing with sl st.
- Work the collar edging, then bands.
- Seam underarms and sleeves with chain + sl st.
Notes
Hook: 6/0 Japanese (3.5 mm). The maker's note (from post): she used a finer No. 6 lace thread (about 310 g, ~natural beige) so she added stitches vs. the original; original chart also used a 3.5 mm hook. Front and back panels worked flat separately, each cast on 130 sts, worked bottom-up; side body 34 rows (32 cm), sleeve cuff 22 rows (21 cm). Buttons: three 18 mm. This image is a Japanese pattern-book schematic page (sizes 24 & 25); measurements are given for both. Stitch counts in this translation are converted from the Japanese 目(sts)/段(rows) notation.
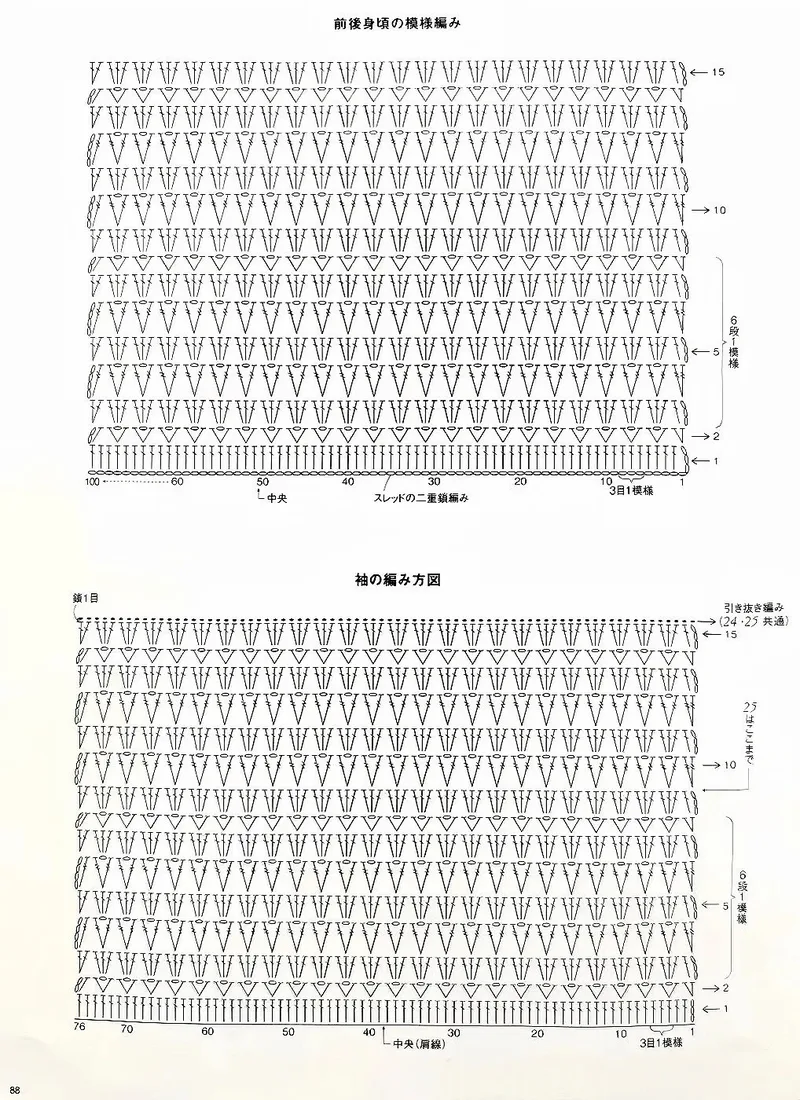
Lace Polo Shirt — Body & Sleeve Pattern Chart

This is the symbol stitch chart for the openwork pattern used on the body and sleeves. The repeat is a 3-stitch fan/V-stitch mesh worked in double crochet.

Body pattern (front & back):
Foundation: double-chain foundation (foundation row), 100 sts wide, centered.
Row 1: Work into the foundation, establishing the mesh base.
Pattern repeat (3 sts = 1 repeat) worked over ~15 rows:
*Skip sts, work a V-group of dc (2 dc, ch, 2 dc or fan) into the mesh space, ch between groups*, repeat across, staggering groups each row to form the diamond mesh.
Rows continue the same V-stitch / fan repeat to row 15.

Sleeve pattern:
Same openwork repeat (3 sts = 1 repeat), 76 sts wide, centered on the shoulder line.
Work the identical V-stitch/fan mesh up to row 15.
Final row (row 15): sl st across (join row) - common to sizes 24 and 25.
Notes
Hook: 6/0 (3.5 mm). This image is a symbol stitch chart showing the openwork V-stitch (fan) mesh pattern. The repeat is a 3-stitch unit; rows of paired dc groups separated by chain spaces create the diamond lace. Same pattern is used for both the body panels and the sleeves; sizes 24 and 25 share the stitch pattern and differ only in row count (see schematic page).
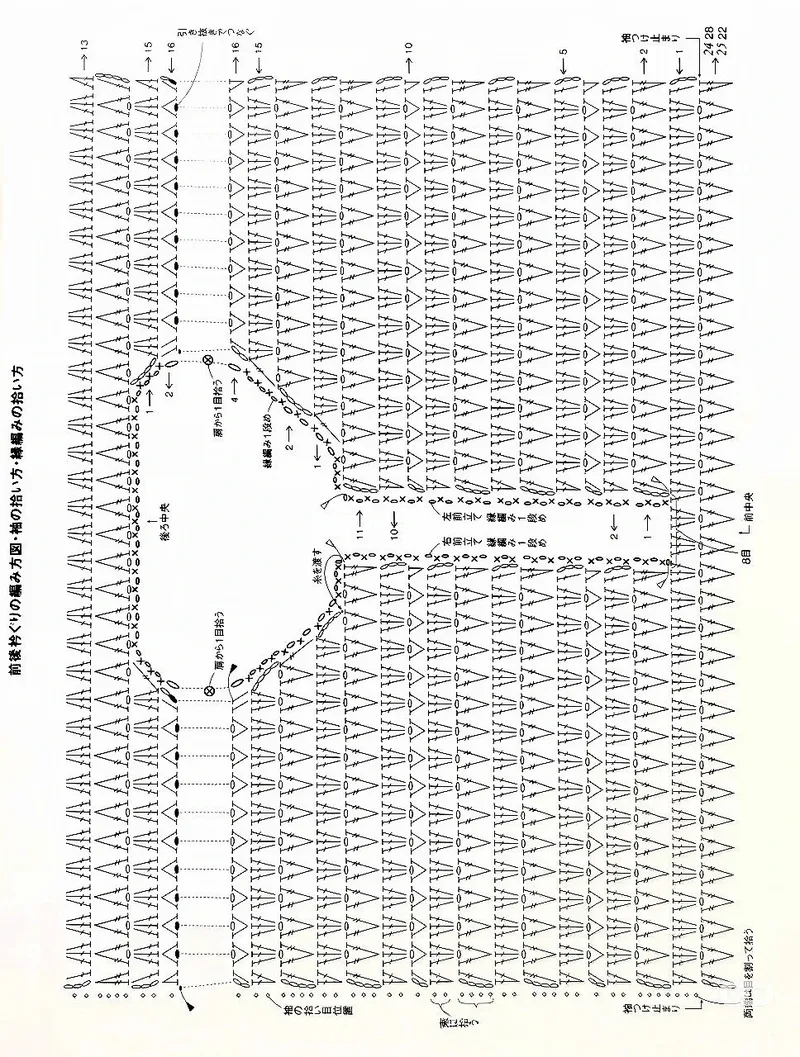
Lace Polo Shirt — Yoke, Armhole & Neckline Shaping Chart

This chart shows the upper body (yoke) of the pattern with armhole and neckline shaping, in the same dc V-stitch / fan mesh (3 sts = 1 repeat).

Work the V-stitch mesh up from the lower body. At the armhole edges, decrease/leave stitches unworked to shape the armholes (step back at the start of the indicated rows).

Neckline:
At the center front, divide for the V/round neck. Decrease along the neck edge in a curve - skip or work fewer fan groups at the neck edge on each successive row to round the opening.
Continue the fan mesh up each shoulder over ~13 rows to the shoulder seam.
Finish neck and armhole edges along the indicated decrease lines.
Notes
Hook: 6/0 (3.5 mm). This image is a symbol stitch chart for the upper body / yoke, showing how the openwork fan mesh is decreased at the armholes and shaped around the front neckline. Same 3-stitch fan repeat as the main body chart. Use this chart together with the schematic page for stitch and row counts.
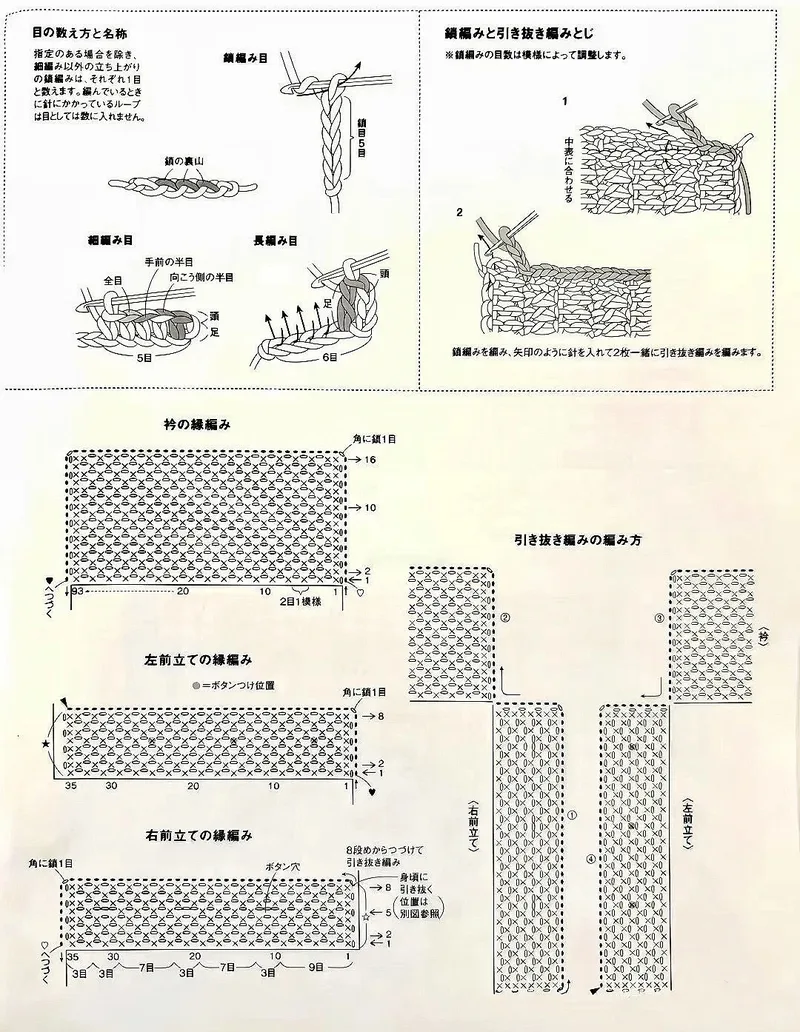
Lace Polo Shirt — Edgings & Finishing Reference

Stitch glossary (top of page):
- Chain stitch (ch) and the back bump (back ridge) of the chain.
- Single crochet (sc) - shown in figure 5.
- Double crochet (dc) - shown in figure 6.

Chain + slip-stitch seam (joining two pieces):
Hold the two pieces right sides together. Work a chain, then insert the hook through both layers as indicated by the arrows and join the two pieces with slip stitch.

Collar edging:
Pick up 33 sts. Work the square/filet mesh pattern (2 sts = 1 repeat) for 16 rows. At each corner, add 1 stitch (work 1 extra st into the corner).

Left front band edging:
Work the filet mesh pattern for 8 rows. ● marks button positions.

Right front band edging:
Work the filet mesh pattern for 8 rows. Make buttonholes (ch-space openings) at the marked positions; join/continue from the body at the indicated pick-up line.

Slip-stitch join method:
The lower diagrams show how the left and right front bands are joined to the body with slip stitch (work sl st along the band, attaching to the body edge).
Notes
Hook: 6/0 (3.5 mm). This image is the finishing/reference page of the Japanese pattern book: a stitch glossary (ch, sc, dc), a chain + slip-stitch seaming method, and the filet-mesh edging charts for the collar and the left/right front bands. The collar edging is 16 rows, the front bands are 8 rows each; buttonholes are placed on the right band to match the 3 buttons. Use with the schematic and pattern charts.
Crochet Diagrams
Frequently asked questions
What hook and yarn does this polo use?
The original pattern uses a 6/0 Japanese (3.5 mm) hook. The maker used a finer No. 6 lace thread (about 310 g, natural beige) and added stitches to compensate, but kept the same 3.5 mm hook.
What is the gauge and how do I check sizing?
Gauge is 19 stitches x 8 rows = 10 cm square in the pattern stitch. The schematic gives measurements for sizes 24 and 25, which share the same stitch pattern and differ only in row count (for example side body 35 cm/28 rows for size 24 versus 27.5 cm/22 rows for size 25).
How is the polo assembled?
Crochet the front and back bodies flat in pattern and join at the shoulders, then pick up and work the sleeves in pattern. Work the collar edging (pick up 93 sts, about 6.5 cm/16 rows) and the front bands, adding buttonholes on the right band, and finally seam the underarms and sleeves with chain and slip stitch.
How many buttons does it take?
Sew on three 18 mm buttons along the front band, with matching buttonholes worked into the right front band.